8 fun and effective strategies for teaching people to learn to weave on a rigid heddle weaving loom
- Emma and Gillian

- Oct 18, 2023
- 4 min read
Updated: Aug 12, 2024
Strategies for teaching people how to learn to weave on a rigid heddle weaving loom.
A few years ago we started making our own rigid heddle looms so that we could teach weaving workshops at local venues and yarn festivals. We have now delivered quite a few workshops and it has been fun and rewarding seeing others develop their weaving skills. It is a genuine privilege being able to share in the sense of delight experienced when a new weaver first removes a piece of beautiful fabric from the loom. More recently we have started selling rigid heddle looms to some of our workshop attendees and others online. These sales are often followed up with the receipt of lovely emails with images of the weaving created which is also something which brings us great joy. This article details some of our experiences and strategies that we feel work well when teaching people to weave and we hope to answer the question 'What approaches work well when running a workshop to teach people to learn to weave on a rigid heddle loom?'.
We provide participants with a ready warped rigid heddle weaving loom for them to learn to weave.
Even as experienced weavers it still takes us 45 minutes to warp a rigid heddle loom ready for a workshop. For new weavers even with tuition this activity would take much longer so we choose to take looms ready warped to workshops so that new weavers can focus on actually learning to weave for their first time.
Choice of warp colours for weaving on the rigid heddle weaving loom
For day long courses we give participants a choice for their warp colours. They are then provided with sufficient yarn in those warp colours to use in the weft with further colours of yarn available if they wish to add other pops of colour. For shorter 2 hour courses we supply looms with a range of warp colours. We usually opt to put three warp colours on each loom.
Starting (and finishing the weave) when weaving a scarf
We have run workshops where we have taught people to hemstitch both ends of their scarf. More commonly we now omit this hemstitching step because for a new weaver this hemstitching can take quite a long time which delays their start to developing their weaving skills. We also recognize that knotting each end of the scarf to create a tasseled fringe looks great.
Encouraging the weft thread to be laid down at an angle
The temptation when starting to weave is to take the shuttle and weft thread directly across the warp. The weft thread goes under and over adjacent warp threads so in fact travels a greater distance than simply across the warp. In order to prevent the sides of the weave from being drawn in at the edges a longer length than the width of the warp is needed for the weft thread. This is why the weft thread is laid down at an angle as this diagonal line provides the additional length needed for the weft thread to travel across the warp as well as going under and over the warp threads.
Why is Houndstooth such a great pattern for a new rigid heddle loom weaver?
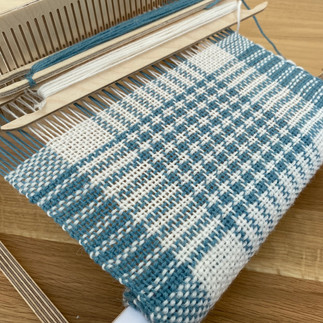
We now incorporate an area of the warp which has alternating pairs of warp threads so that a houndstooth pattern can be woven. A houndstooth pattern is a design created when there are pairs of warp threads and pairs of weft threads in two different colours. One of the things that new weavers find difficult is weaving a balanced weave. A balanced weave is created when in any particular square area of the fabric there are the same number of warp and weft threads. We find that new weavers are quickly able to achieve balanced weaving when aiming to create the houndstooth pattern as they can see when they are beating too gently or too aggressively as both of these create a rectangular rather than the desired square pattern.
We use wool for our workshops
We use a British wool for our workshops. It is a yarn that we have tried and tested and is available in lots of different colours. We know that it weaves beautifully with our 8epi reeds and creates a scarf or fabric which after washing has a beautiful drape and feel. We consider wool to be quite forgiving too as the washing and felting will partially hide or even out any inconsistencies in the weaving which is often a comfort to new weavers.
Starting and finishing a new thread.
There are no doubt various approaches that can be used. When weaving wool we encourage weavers to weave in tails of a previous yarn. With the new yarn we encourage weavers to weave it so that tail is as close to the edge of the warp as possible. We don't tend to encourage the weaving in of a tail of the new yarn as this can make the join bulky. Of course, this works well with wool but is not an approach we would choose to weave when weaving with cotton.
Using a pick up stick to create more complex patterns
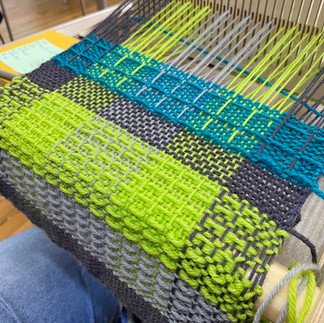
For many first time weavers just focusing on getting to grips with the basics of the tabby weave with and without a houndstooth pattern is sufficient. Others are keen to experiment and learn more and for those we teach them how to do both warp and weft pick up patterns to create really interesting textural weaving.
Conclusion
We hope to have outlined some of the features of our weaving workshops. If you would like to learn to weave then there are two ways that we can help:
(1) You can purchase a rigid heddle scarf weaving kit (click link here to see the range). These kits come with a pre assembled loom, warping peg, threading hook, clamps and shuttles along with instructions to warp the loom. Included is also a pattern/instructions and the corresponding yarn to weave a British wool scarf. Some patterns have a houndstooth design which as we have discussed above is helpful to the new weaver.
(2) You can come along to one of our workshops. Our weaving workshop web page (link here) has the dates and brief details of our workshop events and you can always email us for details of a workshop that you might be interested in.


